Detail Activity & Fragment
Our boiler plate code already created a Detail Activity and Fragment. Let's change Layout file first. Add following code to item_detail.xml file.
<?xml version="1.0" encoding="utf-8"?>
<layout  xmlns:android="http://schemas.android.com/apk/res/android"
    xmlns:tools="http://schemas.android.com/tools">
    <data>
        <variable name="cake"
            type="com.hassanabid.androidcupcake.model.Cupcake"/>
    </data>
<LinearLayout
    android:layout_width="match_parent"
    android:orientation="vertical"
    android:layout_margin="@dimen/text_margin"
    android:layout_height="match_parent"
    >

    <LinearLayout
        android:layout_width="match_parent"
        android:orientation="horizontal"
        android:gravity="center_vertical"
        android:layout_height="wrap_content">
        <ImageView
            android:layout_width="wrap_content"
            android:layout_height="wrap_content"
            android:layout_marginLeft="@dimen/text_margin"
            android:src="@drawable/ic_star_black_36dp"/>
        <TextView
            android:id="@+id/cupcake_rating"
            android:layout_width="match_parent"
            android:layout_height="wrap_content"
            style="?android:attr/textAppearanceMedium"
            android:padding="16dp"
            android:text='@{String.valueOf(cake.rating)}'
            android:textColor="@android:color/black"
            android:textIsSelectable="true"/>
    </LinearLayout>

    <LinearLayout
        android:layout_width="match_parent"
        android:orientation="horizontal"
        android:gravity="center_vertical"
        android:layout_height="wrap_content">
    <ImageView
        android:layout_width="wrap_content"
        android:layout_height="wrap_content"
        android:layout_marginLeft="@dimen/text_margin"
        android:src="@drawable/ic_attach_money_black_36dp"/>
    <TextView
        android:id="@+id/cupcake_price"
        style="?android:attr/textAppearanceMedium"
        android:layout_width="match_parent"
        android:layout_height="wrap_content"
        android:padding="16dp"
        android:text="@{cake.price}"
        android:textColor="@android:color/black"
        android:textIsSelectable="true" />
    </LinearLayout>

    <LinearLayout
        android:layout_width="match_parent"
        android:orientation="horizontal"
        android:gravity="center_vertical"
        android:layout_height="wrap_content">
        <ImageView
            android:layout_width="wrap_content"
            android:layout_height="wrap_content"
            android:layout_marginLeft="@dimen/text_margin"
            android:src="@drawable/ic_person_black_36dp"/>
        <TextView
            android:id="@+id/cupcake_writer"
            style="?android:attr/textAppearanceMedium"
            android:layout_width="match_parent"
            android:layout_height="wrap_content"
            android:textColor="@android:color/black"
            android:padding="16dp"
            android:text="@{cake.writer}"
            android:textIsSelectable="true"/>
    </LinearLayout>

    <LinearLayout
        android:layout_width="match_parent"
        android:orientation="horizontal"
        android:gravity="center_vertical"
        android:layout_height="wrap_content">
        <ImageView
            android:layout_width="wrap_content"
            android:layout_height="wrap_content"
            android:layout_marginLeft="@dimen/text_margin"
            android:src="@drawable/ic_date_range_black_36dp"/>
        <TextView
            android:id="@+id/cupcake_date"
            style="?android:attr/textAppearanceMedium"
            android:layout_width="match_parent"
            android:layout_height="wrap_content"
            android:padding="16dp"
            android:text="@{cake.createdAt}"
            android:textIsSelectable="true" />
    </LinearLayout>

</LinearLayout>
</layout>
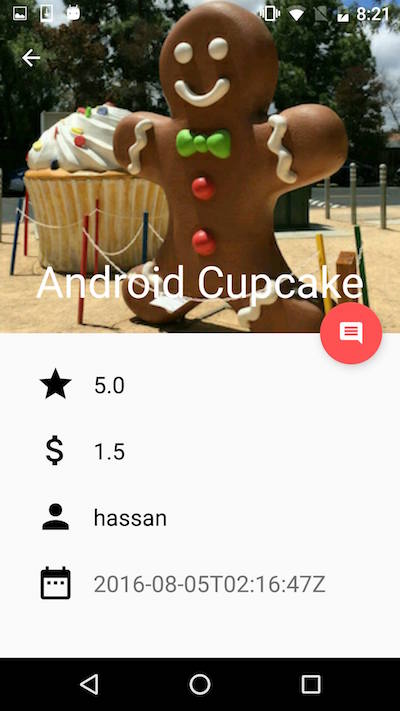
If you closely look at the UI element, you will see that we added few icons. You can download them from here https://design.google.com/icons/ or drawable-xxxhdpi folder from Github.
Following part of the xml layout might be new to you?
 <data>
        <variable name="cake"
            type="com.hassanabid.androidcupcake.model.Cupcake"/>
    </data>
We are using new Data binding Library to connect UI elements with data directly in layout. You can read more about it here https://developer.android.com/topic/libraries/data-binding/index.html
Firstly, we have to pass data from ItemListActivity to ItemDetailActivity and then Fragment.
In SimpleItemRecyclerViewAdapter add the following code in onClick method.
holder.mView.setOnClickListener(new View.OnClickListener() {
                @Override
                public void onClick(View v) {
                    if (mTwoPane) {
                        Bundle arguments = new Bundle();
                        arguments.putString(CupcakeDetailFragment.ARG_NAME_ID, holder.mRealmObject.getName());
                        arguments.putString(CupcakeDetailFragment.ARG_IMAGE_ID,holder.mRealmObject.getImage());

                        CupcakeDetailFragment fragment = new CupcakeDetailFragment();
                        fragment.setArguments(arguments);
                        getSupportFragmentManager().beginTransaction()
                                .replace(R.id.cupcake_detail_container, fragment)
                                .commit();
                    } else {
                        Context context = v.getContext();
                        Intent intent = new Intent(context, CupcakeDetailActivity.class);
                        intent.putExtra(CupcakeDetailFragment.ARG_NAME_ID, holder.mRealmObject.getName());
                        intent.putExtra(CupcakeDetailFragment.ARG_IMAGE_ID, holder.mRealmObject.getImage());

                        context.startActivity(intent);
                    }
                }
            });
Make sure to have these static variables declared in ItemDetailFragment
 public static final String ARG_NAME_ID = "item_name_id";
    public static final String ARG_IMAGE_ID = "item_image_id";
Then in ItemDetailActivity update the following code. (Final version will be as follows)
if (savedInstanceState == null) {
            // Create the detail fragment and add it to the activity
            // using a fragment transaction.
            Bundle arguments = new Bundle();
            arguments.putString(CupcakeDetailFragment.ARG_NAME_ID,
                    getIntent().getStringExtra(CupcakeDetailFragment.ARG_NAME_ID));
            arguments.putString(CupcakeDetailFragment.ARG_IMAGE_ID,
                    getIntent().getStringExtra(CupcakeDetailFragment.ARG_IMAGE_ID));
            CupcakeDetailFragment fragment = new CupcakeDetailFragment();
            fragment.setArguments(arguments);
            getSupportFragmentManager().beginTransaction()
                    .add(R.id.cupcake_detail_container, fragment)
                    .commit();
        }
Finally in ItemDetailFragment, We will are going to receive intent items.
 // Create a RealmConfiguration that saves the Realm file in the app's "files" directory.
        RealmConfiguration realmConfig = new RealmConfiguration.Builder(getActivity()).build();
        Realm.setDefaultConfiguration(realmConfig);

        // Get a Realm instance for this thread
        Realm realm = Realm.getDefaultInstance();
        if (getArguments().containsKey(ARG_NAME_ID)) {

            mTitle = getArguments().getString(ARG_NAME_ID);
            mImageURL = getArguments().getString(ARG_IMAGE_ID);
            cake = realm.where(Cupcake.class).equalTo("name", mTitle).findFirst();
            if(cake != null)
                Log.d(LOG_TAG,"realm object retrieved : " + cake.getName());

            Activity activity = this.getActivity();
            CollapsingToolbarLayout appBarLayout = (CollapsingToolbarLayout) activity.findViewById(R.id.toolbar_layout);
            if (appBarLayout != null) {
                appBarLayout.setTitle(mTitle);
            }
        }
We need little more code for our data binding to work. In onCreateView method add the following code.
        CupcakeDetailBinding binding  = DataBindingUtil.inflate(inflater, R.layout.cupcake_detail, container, false);
        View rootView = binding.getRoot();
        binding.setCake(cake);

        if(mImageURL != null) {
            loadBackdrop(CupcakeListActivity.API_URL_PROD  + mImageURL,rootView);
        } else {
            Log.d(LOG_TAG,"imageurl is null");
        }
        return rootView;
and loadBackdrop method is as follows
private void loadBackdrop(String image_url, View root) {
        final ImageView imageView = (ImageView) getActivity().findViewById(R.id.cake_image);
        Glide.with(getActivity())
                .load(image_url)
                .centerCrop()
                .crossFade()
                .into(imageView);
    }
If you have reached this far! Well-done :) Build the app and run on your device. If you run into any error, don's hestiate to ask me!
Part-2 of this tutorial is coming soon where you will implement Login, Signup and Add/Delete/Modify features.
Good luck !